How to Use our Learning Space (aka Help with Moodle)
Look for Moodle help items by topic, alphabetically or with the a search option.
Updated: September 2023
Special | A | B | C | D | E | F | G | H | I | J | K | L | M | N | O | P | Q | R | S | T | U | V | W | X | Y | Z | ALL
A |
|---|
Attach a file to a postYou can attach documents to a post in a discussion forum. Follow the steps below.
Updated: August 2, 2019, SR | |
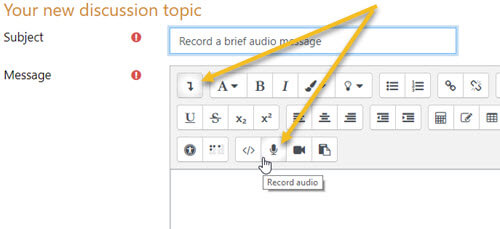
Audio: Record audio in your forum postingYou can record short audio messages directly into your discussion forum postings. Adding your voice to the other comments and ideas you write can make your posts more meaningful for other learners and your instructor. Note: The built-in recording tool limits your audio recording time to two minutes. 1.
To record a message you'll need a microphone. You may use a headset
with microphone to plug into a computer or laptop or you can record
using a phone and the Moodle app. 2. Start a new discussion topic in your forum. Add a subject heading and enter some text to explain what the recording will be about. 3. Expand the editor toolbar by clicking on the down arrow that appears in the first position on the toolbar. Look for the 'Record audio' button on the bottom row.
4. Check your notes, make sure your microphone is ready and click on the recording button.
5.
Check your recording by clicking on the right-facing arrowhead in the
embedded player. If you're happy with your recording, click 'Attach recording.'
Updated: August 2, 2019, SR | |
C |
|---|
Calendar: Find and Track EventsKeep on top of important events or look ahead to what's next by checking the Calendar. Find the Calendar:
Find upcoming events in the Calendar:
Import an event (or events) into your preferred Calendar system:
| |
Chats: How to join one during the conference call
| |
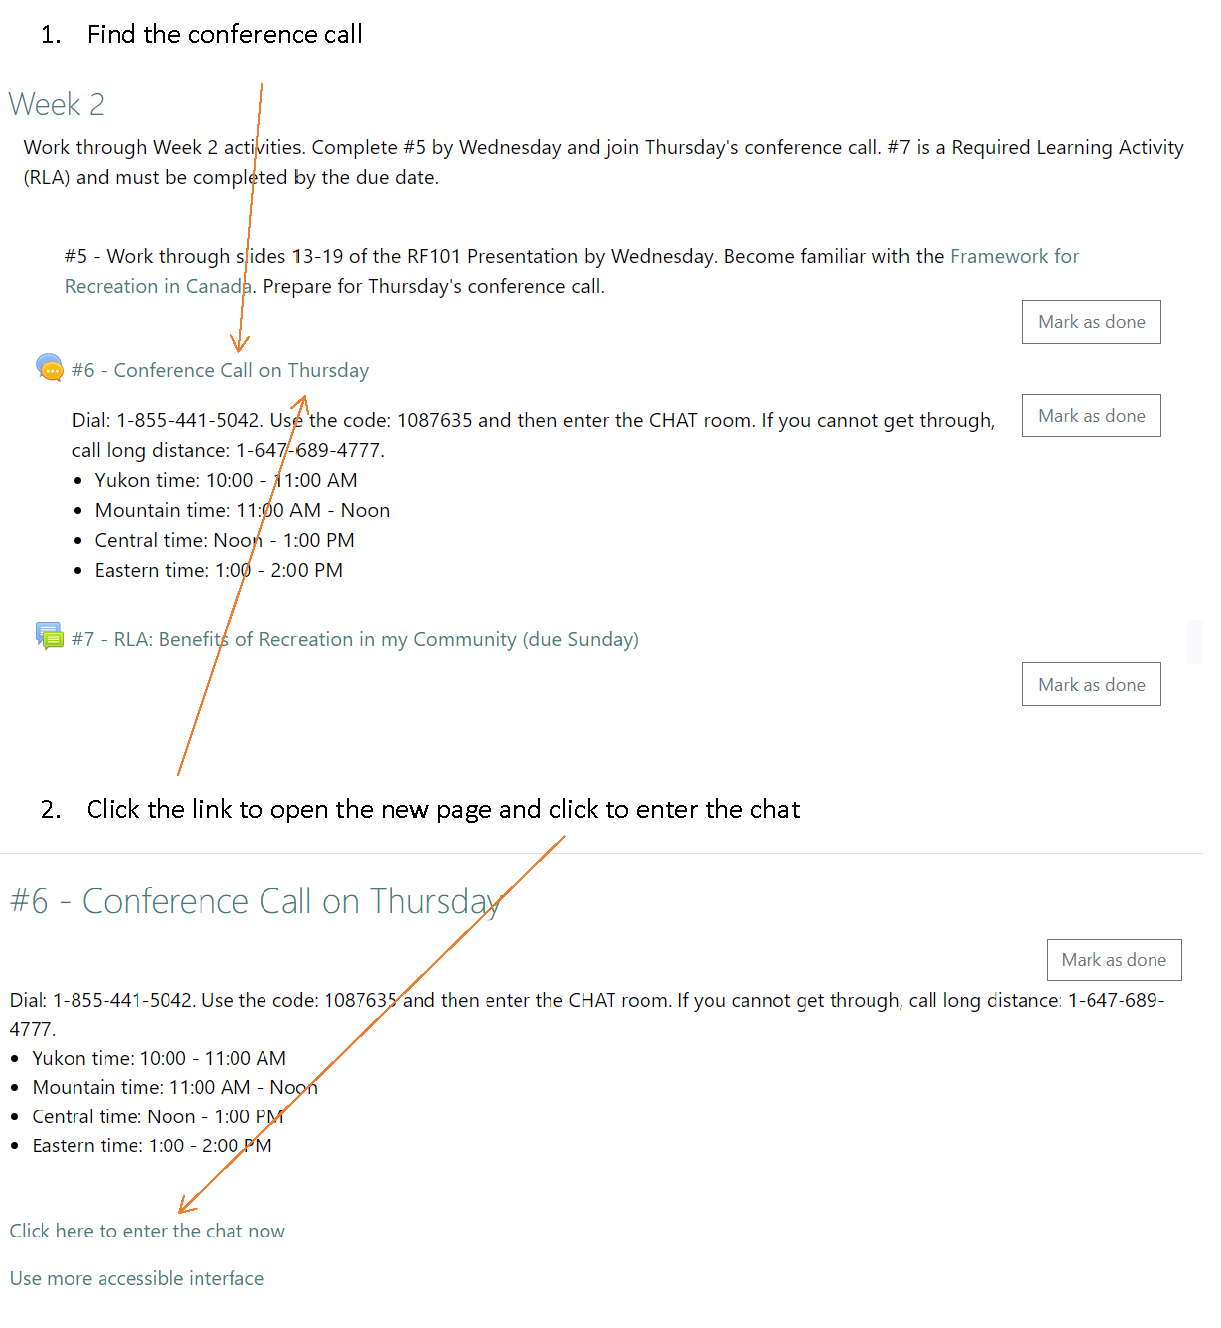
Conference CallsWe use a conference call system hosted by Clarity Conferencing. You can choose to join in one of three ways. 1. By phone at: 1-855-441-5042 with the code: 1087635. Choose by phone if you do not have access to a computer or do not have Internet. This is a toll free number so you will not be charged for long distance. If the toll free number doesn't work, you can dial long distance using 1-647-689-4777. OR 2. On your computer at: https://recreation-north-rec-parks-assoc-of-the-yukon.meet.clarityconferencing.com/conf/call/1087635. Choose your computer if you have reliable high-speed Internet. OR3. With your phone AND computer. Choose to use both if you have a computer but your Internet is slow or intermittent. Watch the video below to learn how to join using both your phone and computer. | |
Contact: Send a message or email to another personCommunicate privately with another learner, with your trainer, or in a group set up by your trainer. Option 1 - Message
Option 2 - Message
Option 3 - Email
| |
D |
|---|
Dashboard - navigate and customizeYou can use your Dashboard to stay on track with your learning events and easily find where you left off each time you return to the Learning Space. 1. Navigate to your Dashboard from the top menu. 2. The default view (before you customize it - see final step for how) shows a series of blocks outlined in gold. You can choose the Customize this page button to move, hide, delete or configure each block. 3. Explore each block before you customize - try to understand how you can use the information and what fits your learning preferences. My courses block: shows the courses (learning events) you are registered in and links to the complete listing of courses available to you. Course overview block: (default Card view)
Timeline block:
Calendar block: displays a month at a time, shows events for your courses Upcoming events: shows events in your course(s) starting from the current day Latest badges: shows any badges you've earned Online users: shows who is online in the Learning Space 4. If you'd like to modify or customize your dashboard, click Edit mode at the top right of the page. This displays two icons at the top right of each block:
If you make a mistake or change your mind, you can select Reset page to default. Updated: August 2022 CS | |
E |
|---|
Email: Manage Emails from ForumsWhen there is lots of discussion in a learning event, you may want to manage the "flow". You can set up a filter on your email program, or you can change your Forum Preferences in Moodle. It is NOT recommended to 'unsubscribe' from a forum as you could miss important messages and information. Instead, manage the flow of emails by choosing an email digest. A digest will send you one email with all the forum posts made in a day. You will not receive an email if there are no new posts. To change your Forum Preferences:
NOTE: If you decide to 'unsubscribe', you will need to log in daily in order to find and read any new posts. | |
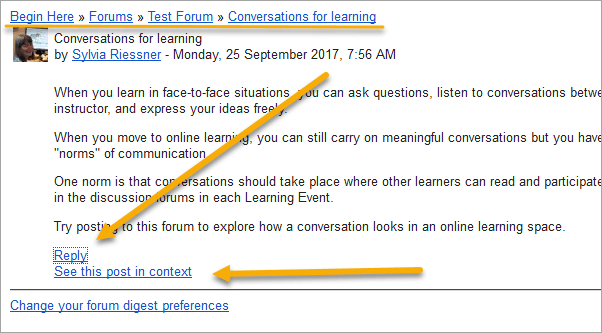
Emails: Responding to forum emailsWhen you use Moodle, you receive emails when your trainer posts to a forum in a learning event, when someone replies to a forum post, or when someone sends you a private message. The email messages look something like this:
If you try to reply to the message, from your email program, you'll get a "Do Not Reply" message and your message will not be delivered as you planned. To respond to an email from a forum posting
 | |
F |
|---|
Forum Posts: Listing of All Your Forum PostsTo find a list of your own posts:
| |
Forums: Post and respond to discussionsDiscussion forums are an important way of communicating. Here is a basic overview of how to post or respond to posts within forums. Start a new conversation (called a 'thread'):
NOTE: You'll see a message that says you have 30 minutes to change your post before it is shared with others in the Forum. If you prefer a video, check out the 'Post Topic to Forum' video on . To reply to a post:
If you prefer a video, check out the 'Reply to Post' video on . To reply to an email you receive from a forum discussion:Our settings will not let you post a reply in a forum by replying to an email. Instead...
OR
| |
I |
|---|
Images: Display images in your postsYou can display digital copies of photos, drawings, illustrations, and charts in the Learning Space. For more information, check out:
| |
Images: Share an image in your postIt's
easy to add photographs (images) to your forum posts as long as the images aren't too big for others to view. Here's how to make your images as small as possible so others can see them too. Resize and compressImages are sized in 'pixels' (width and height). Select a width of around 500 pixels wide. Most apps or programs automatically adjust the height through 'proportionate resizing. Resize and compress your image by:
To add your compressed image into a forum post:
| |
L |
|---|
Learning Events: Where to find learning events (courses)The Recreation North Training Program calls its courses 'learning events'. In the Learning Space, you will see learning events referred to as 'courses.' This is because we use Moodle and cannot change the term 'course'. You can find your learning events/courses from your Home page, your Dashboard, and under 'My Courses' in the top menu bar. From the Home page: From the Dashboard:Click ‘Dashboard' or the Recreation North Training Program icon at the top left of your page. Learning events (courses) are listed in several places. ‘My courses’ will be found in the middle of the Dashboard page below the 'Timeline.' You can change your Timeline to show you what's coming up as well as what is overdue. My CoursesClick ‘My Courses’ in the top green menu to find a list of all your learning events. Scroll down to read an overview of each learning event, including its start date. Looking for older learning events?If you are looking for a learning event that has already ended or if the instructions above don't work, click 'My courses' at the top of the page. Make sure 'All courses' is selected. Use the 'Search' space to enter part of the name of the learning event. Finding your way aroundWatch this brief video. It shows how to use your Dashboard and find your learning events.
Updated: September 2023, CS | |
Logging in and out of the Learning SpaceWhen you receive an email inviting you to log-in to the Recreation North Learning Space:
After logging in, on the top, right hand side of the screen, you'll see your name next to an empty circle (where your profile picture will display). You'll also notice a new column on the left that allows you to navigate to the 'Calendar', Messages, your Profile, etc. | |
M |
|---|
Message privatelyUse the private message feature in Moodle to communicate with other users of Recreation North's Learning Site. Option 1 - Message
Option 2 - Message
Option 3 - Email
Modify your message settings
| |
Messaging - how to message groupsParticipants are able to message one other participant at a time, using the Participants page or Moodle messaging. Trainers can send more pressing or urgent messages to a group of participants, or all participants in a learning event, as follows:
| |
Moodle DocumentationFor help with using basic Moodle tools and activities, check out the official resources on Moodle DocsFor
details on how to use Moodle features customized for RecNorth Moodle
spaces, check out the other topics in this glossary | |
Move around in the Learning SpaceNavigation panel or drawerAt the top right is an arrow that opens your navigation panel or drawer. Click on the arrow to show or hide the navigation drawer. When open, you will see a menu with upcoming events, your badges, latest announcements and online users. DashboardQuickly access your Dashboard by clicking 'Dashboard" in the top menu of the screen. Your Dashboard is a personalized home page that includes an overview of your learning events in the centre and other information (e.g. upcoming events) down the right-hand side. Get into a Learning Event (Course)You can use the your Dashboard or top menu bar to get into a learning event or course space. Your Dashboard has a listing of your courses (My courses) and a Course Overview area that allows you to change the way you look at courses (In progress, Future, Past). You also have options to star or hide specific courses. Updated: August 2022 CS | |
P |
|---|
Password changesYou may want to change your password occasionally or when you first log-in. To change your password:
| |
Photos - Making photographs smallerResize and compressImages are sized in 'pixels' (width and height). Select a width of around 500 pixels wide. Most apps or programs automatically adjust the height through 'proportionate resizing.' Resize and compress your image by:
Click here for more information. | |
Photos: Add a photo to your postThe steps to post a photo to a forum are the same for any type of image:
| |
Photos: Getting the right orientationSometimes a photo displays incorrectly (usually sideways) when added to a post. The way you hold your camera or phone when taking the picture can make this happen. Landscape orientation, where you hold the camera/phone horizontally, is recommended for Moodle. Most modern devices have built-in orientation sensors in that add information to the photograph (EXIF data) so it is re-oriented and displayed correctly when you share it to a website. If your device doesn't correct the orientation of your photo, use photo editing software before trying to post it again. On a Windows computer...
On a Mac computer...
For an iPad or iPhone... | |
Profile Pictures: How to add or updateTo add a picture for your profile image:
For more information, check out the written explanation from Moodle. To change your Profile Image
| |
R |
|---|
Required Learning ActivitiesRequired Learning Activities or RLAs are posted in the RLA forum. To learn how to share your RLA with words, audio, files, images, videos, etc., search the word "post" in this Glossary. To learn how to create "awesome" RLAs, check out this resource. | |
S |
|---|
Share a video from the Internet1. Find a video you want to share as part of your forum posting. Look for a Share button or copy the URL from the web browser address bar. 2. Prepare your forum post and introduce the video you want to share. Then, select the Insert media icon from your editing toolbar. When you hover over the icon, it will display 'Insert or edit audio/video file.'
| |
Share a video from your computer or mobile deviceNote: Remember to select short clips to make it easier for other participants in the course to play it back. We suggest recordings no longer than two minutes. 1. Prepare a forum post. When you are ready to add a short video clip, click on the Add media icon in the toolbar. 2. You can add a short video file from the Link tab OR the Video tab of the Insert media page. For most situations, it is simplest to use the Link page.
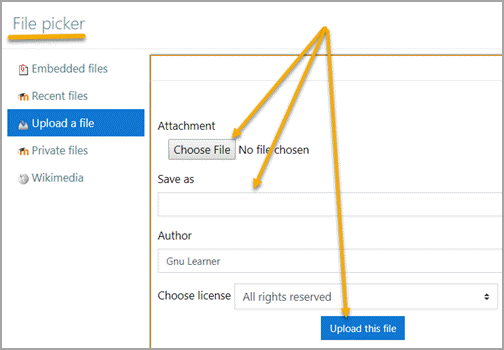
3. Click on the 'Choose File' button. The File picker windows opens, and you'll be able to search your computer or device to find the video recording.
| |
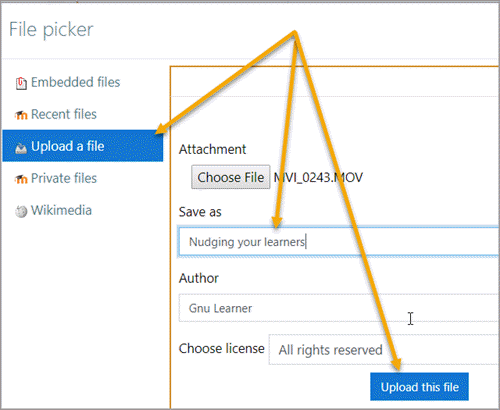
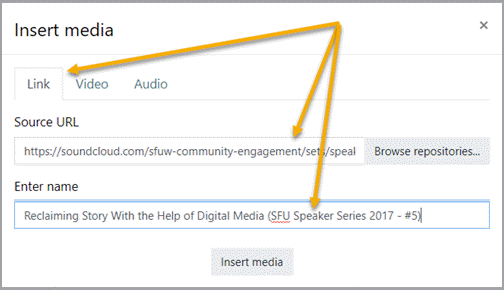
Share an audio file from your computer or mobile deviceNote: Use short clips to make it easier for other participants in the course to play it back. We suggest recordings no longer than two minutes. 1. Prepare a forum post. When you are ready to add a short audio clip, click on the Insert media icon in the toolbar. 2. You can add a short audio recording from the Link tab OR the Audio tab pages of the Insert media page. For most situations, it is simplest to use the Link page.
3. Click on the 'Choose File' button. The File picker windows opens, and you'll be able to search your computer or device to find the audio recording.
4. You'll see the Insert media window again with your file link and name.
Your audio recording can be played back from the forum posting by clicking on the right facing arrow in the small player. | |
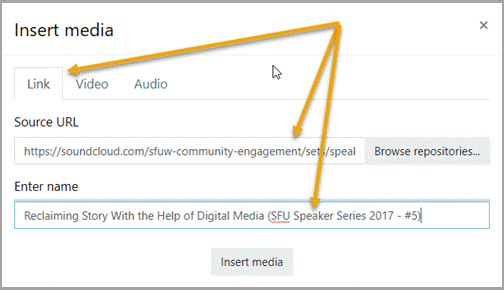
Share an audio recording from the Internet1. Select a recording you want to share as part of your post. Copy the web location of the audio recording.
2. Go to the forum and write any introduction or comments about the recording you are going to share. 3. Look for the Insert media icon in the editing toolbar. When you hover over the icon it shows 'Insert or edit audio/video file.'
4. The name of the recording displays in your forum post. When anyone clicks the hyperlinked name, it will open the web page where the audio recording is stored and they can listen to it. Note: You cannot link to an external audio site by pasting the URL web location in the Audio tab of the Insert media page. | |
T |
|---|
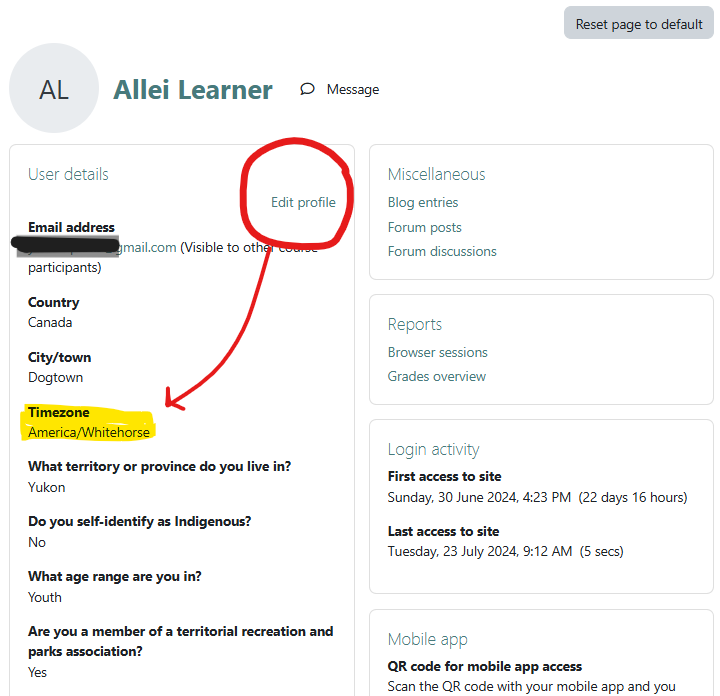
Time ZoneSet up your time zone When you create an account, the default time zone is America/Whitehorse. Change your time zone setting in your Profile. Click the drop-down arrow beside your initials or profile picture, then choose Profile. In your Profile window, choose Edit Profile as shown below and then find your time zone. Note for NWT learners: Moodle dropped Yellowknife as a time zone option in 2023. Choose America/Edmonton instead.
| |
V |
|---|
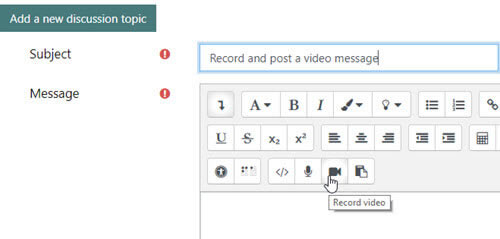
Video: Record video in your forum postingYou can add short video messages
to your forum posts. Adding short video recordings to the comments and
ideas you write can make
your posts more meaningful for other learners and your instructor. Note: The built-in recording tool limits your audio recording time to two minutes. 1. To record a video, you'll need a webcam (may be built into your laptop or mobile device). If you plan to use your mobile device, make sure you have installed the Moodle app. 2. Start a new discussion topic in your forum. Add some text to explain what the recording will be about. 3. Expand the editor toolbar by clicking on the down arrow that appears in the first position on the toolbar. Look for the 'Record video' button on the bottom row.
4. Check your notes, position your camera and click on the recording button.
5.
Check your video by clicking on the right-facing arrowhead in the
embedded player.
Notes:
| |
Video: Share video recordingsSharing short video recordings can help you make a point or add some information or humour to your forum postings. You can share video recordings from public pages on the Internet OR
you can upload and share short video clips from your computer or mobile
device. Check out how: | |